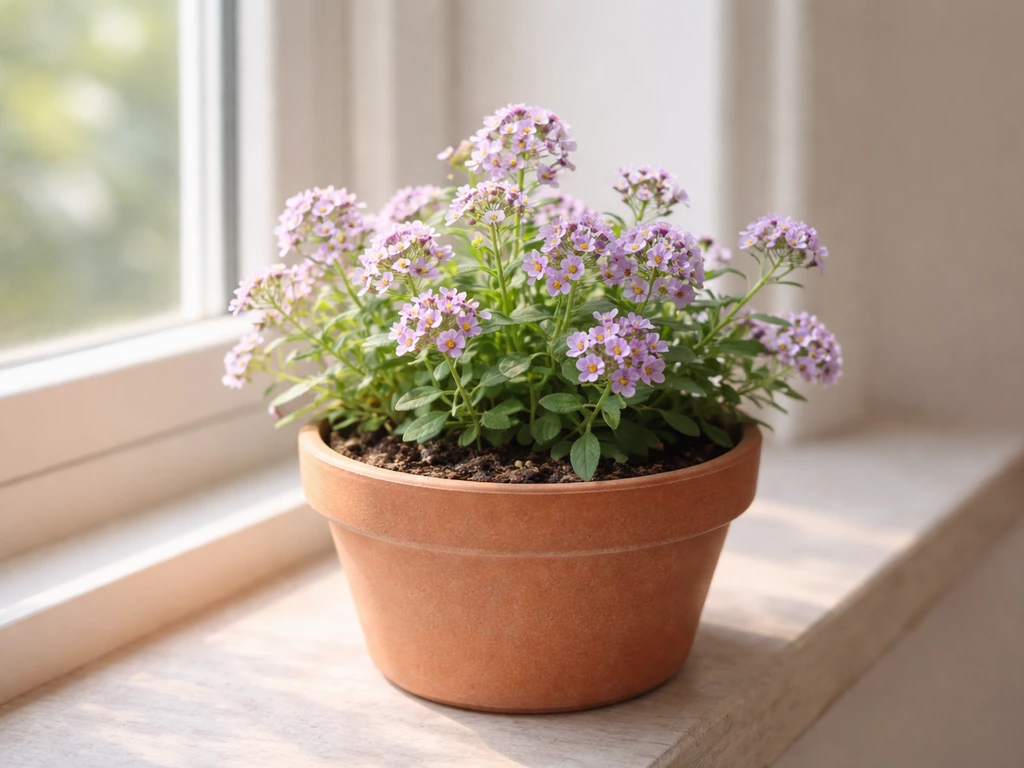
Yes, sweet alyssum (Lobularia maritima) can grow indoors, and it can even flower reliably if you give it enough light. Can lily grow indoors, and what does it need to bloom? That last part is the catch. Alyssum is a full-sun plant at heart, and a dim windowsill will get you leggy green stems with little to no bloom. Put it under a strong grow light or in your sunniest south-facing window, keep temperatures cool, and give it good airflow, and you will have a compact, fragrant, flowering plant that works beautifully in a pot or window box indoors.
Can Alyssum Grow Indoors? How to Start and Succeed
James Hartwell
4 May 2026
Can alyssum actually grow indoors (and when it won't)

Alyssum does best when it gets what it gets outdoors: full sun, cool air, and excellent drainage. Indoors, those conditions are achievable but not automatic. The plant will survive in lower light, but flowering is directly tied to light intensity. Outdoors it wants full sun for best blooming, which means your indoor setup needs to match that as closely as possible. A south-facing window in late spring or summer can work. A north-facing window almost certainly won't produce flowers. A dedicated grow light set up 6 to 12 inches above the plant for 14 to 16 hours a day is genuinely the most reliable path to blooms indoors.
Where indoor alyssum tends to fail: low light causing spindly growth, warm indoor temperatures above 75°F slowing or stopping blooms entirely, and overwatering in pots without drainage. Alyssum naturally tolerates dry soil and actually pauses flowering during heat and drought stress. If your apartment runs warm in summer, expect the plant to sulk until you cut it back and conditions cool down. If you can keep your indoor space between 60 and 70°F, alyssum will be much happier.
Best indoor conditions: light, temperature, and airflow
Light
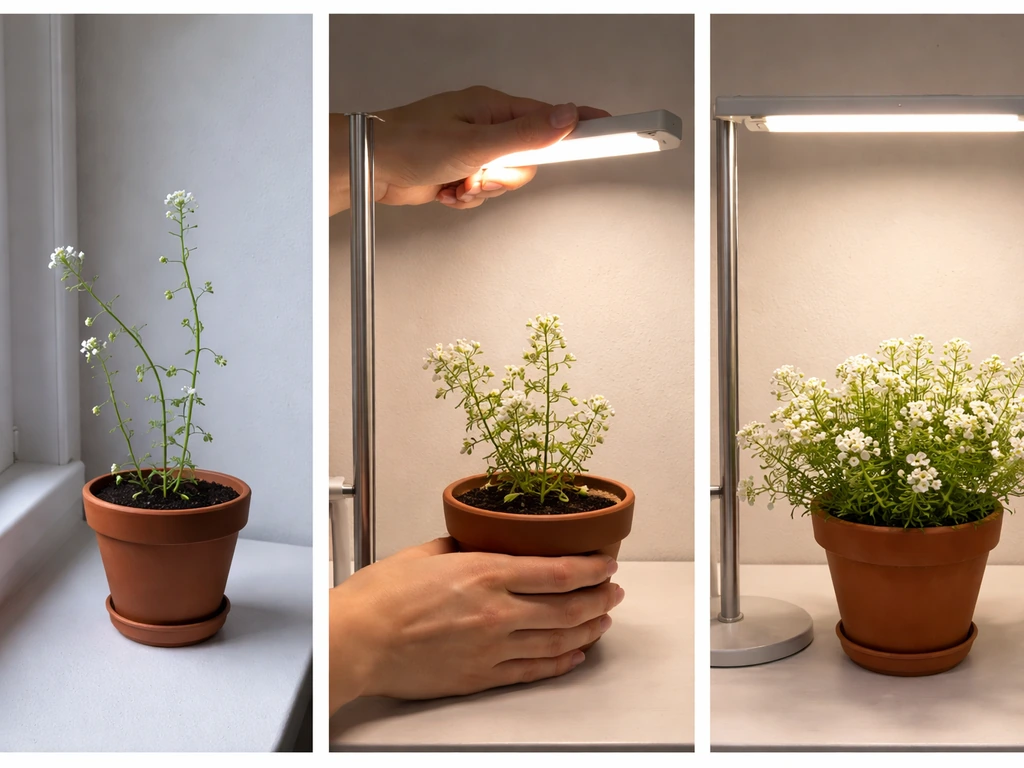
This is the single most important factor. Alyssum needs the equivalent of full sun, and most home windows don't deliver that on their own. A south- or west-facing window can work in late spring when days are long, but from fall through early spring, or in any apartment where direct sun is limited, a full-spectrum LED grow light is the practical answer. Position the light 6 to 12 inches above the plant canopy and run it for 14 to 16 hours a day. A basic outlet timer takes all the guesswork out of this. If you notice your plant getting leggy and reaching toward the light, it's not getting enough.
Temperature
Cool is the operative word. Alyssum flowers best between 60 and 70°F. Above 75°F, blooming slows or stops. UNH Extension reports that powdery mildew infection and spore production are favored by conditions around 41, 72°F, especially cloudy, cool, humid weather. This is actually one of the underrated advantages of growing alyssum indoors in early spring or fall: you can keep the temperature in that sweet spot more easily than you can outdoors in midsummer. If your home runs warm, place the pot near a slightly cracked window or in a cooler room. Avoid placing it near heating vents or radiators.
Airflow
Alyssum is prone to powdery mildew, and stagnant air indoors makes that worse. Cornell research confirms that powdery mildew spores can germinate even at relatively low humidity levels, so don't assume a dry room means you're safe. A small fan running on low near your plants for a few hours a day makes a real difference. It strengthens stems, reduces mildew risk, and mimics the gentle outdoor breeze the plant is accustomed to. Keep the fan at a distance so it's moving air across the leaves, not blasting them.
Starting alyssum from seed indoors
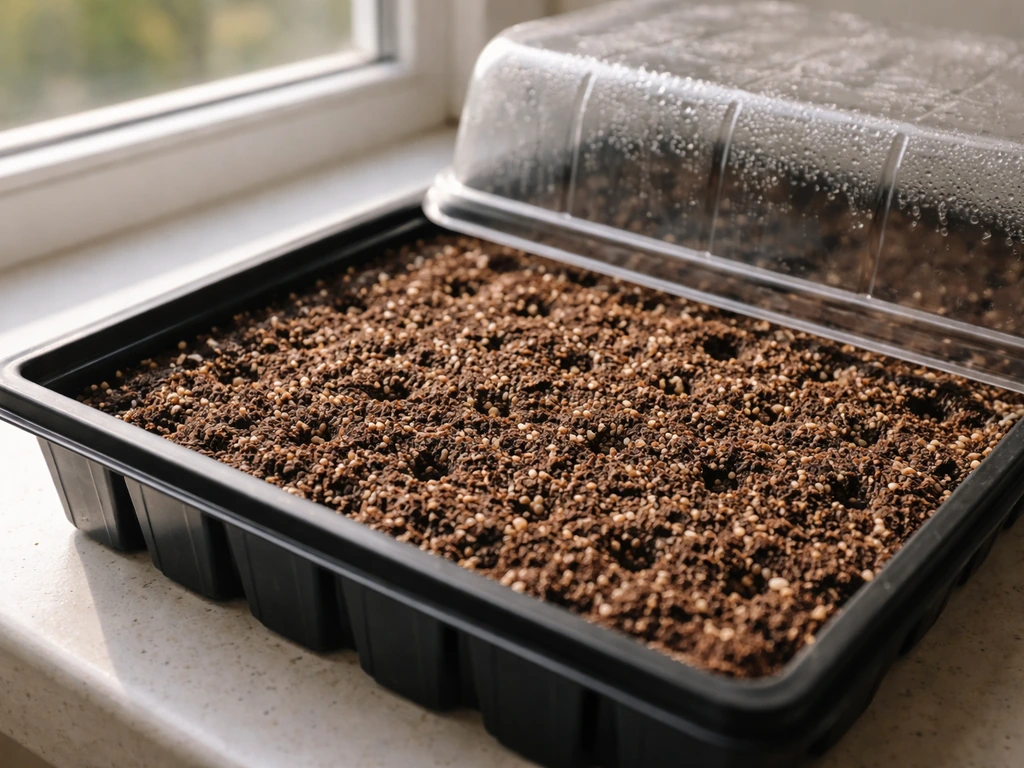
Starting from seed is easy and inexpensive. The main things to get right are light during germination (yes, even then), soil temperature, and not overwatering your seedlings. Here's the step-by-step process:
- Choose your container: A shallow seed tray or any small container with drainage holes works fine. Fill it with a commercially available soilless seed-starting mix. Penn State Extension confirms most bagged soilless mixes are already free of damping-off fungi, so you don't need to sterilize anything. Avoid garden soil, which can compact and harbor pathogens.
- Sow the seeds on the surface: Press seeds lightly onto the surface of moist mix. Do not cover them with soil. Alyssum seeds need light to germinate — this is confirmed by UF/IFAS Extension and multiple seed suppliers. Just a gentle press to make contact with the mix is all you need.
- Mist gently: Use a spray bottle to mist the surface. You want the mix damp but never soggy. Bottom watering (setting the tray in a shallow dish of water until moisture wicks up) is even better because it avoids disturbing the seeds and reduces damping-off risk.
- Set the temperature: Place your seed tray somewhere with a soil temperature of 65 to 75°F. A seedling heat mat under the tray is ideal and is recommended by UMN Extension for reducing damping-off risk. If your home is consistently in the mid-60s, you may not need a mat.
- Provide light immediately: Place the tray under your grow light or in your brightest window right away. Seeds need light to germinate, so a dark spot like a cabinet is not appropriate here.
- Wait for germination: Expect seeds to sprout in 8 to 15 days at the right temperature. Once seedlings emerge, make sure they're getting strong light or they'll stretch and become weak almost immediately.
- Thin seedlings: Once they have their first true leaves, thin to one seedling every 2 to 3 inches in the tray, or start seeds a little more spread out to begin with. Crowded seedlings increase damping-off and mildew risk.
A note on damping-off: this is the main killer of young alyssum seedlings indoors. It's caused by fungi that thrive in wet, poorly ventilated conditions. Utah State Extension notes it can spread via splashing water and contaminated tools. Keep your tray lightly moist rather than wet, don't reuse old trays without cleaning them, and run a small fan nearby. Fungus gnats, which are common around indoor plants, can also spread damping-off fungi, so watch for adult gnats hovering near your seedlings from the start.
Transplanting and pot setup
Once your seedlings are about 2 to 3 inches tall and have a couple sets of true leaves (usually 3 to 4 weeks after germination), they're ready to move to their permanent indoor container. A 6-inch pot works well for a single plant, but alyssum looks best when massed together. A window box or a pot 10 inches or wider lets you plant several seedlings together, spacing them 6 to 8 inches apart. Alyssum spreads 6 to 12 inches at maturity, so give each plant enough room to bush out.
Use a well-draining potting mix, not a moisture-retaining formula. Sweet alyssum does best in full sun to partial shade and prefers well-drained soils well-draining potting mix. Drainage is non-negotiable. Make sure every container has holes in the bottom and that you're not letting the pot sit in standing water. For mix, a standard all-purpose potting soil works, but mixing in a little perlite improves drainage further.
Once transplanted, pinch the growing tips of each seedling about 1 to 2 weeks after transplanting. Proven Winners recommends this step for producing fuller, bushier plants rather than tall, spindly ones. It feels counterintuitive when the plant is small, but it pays off within a few weeks. Just pinch off the top pair of leaves on each stem.
Watering, feeding, and keeping it blooming
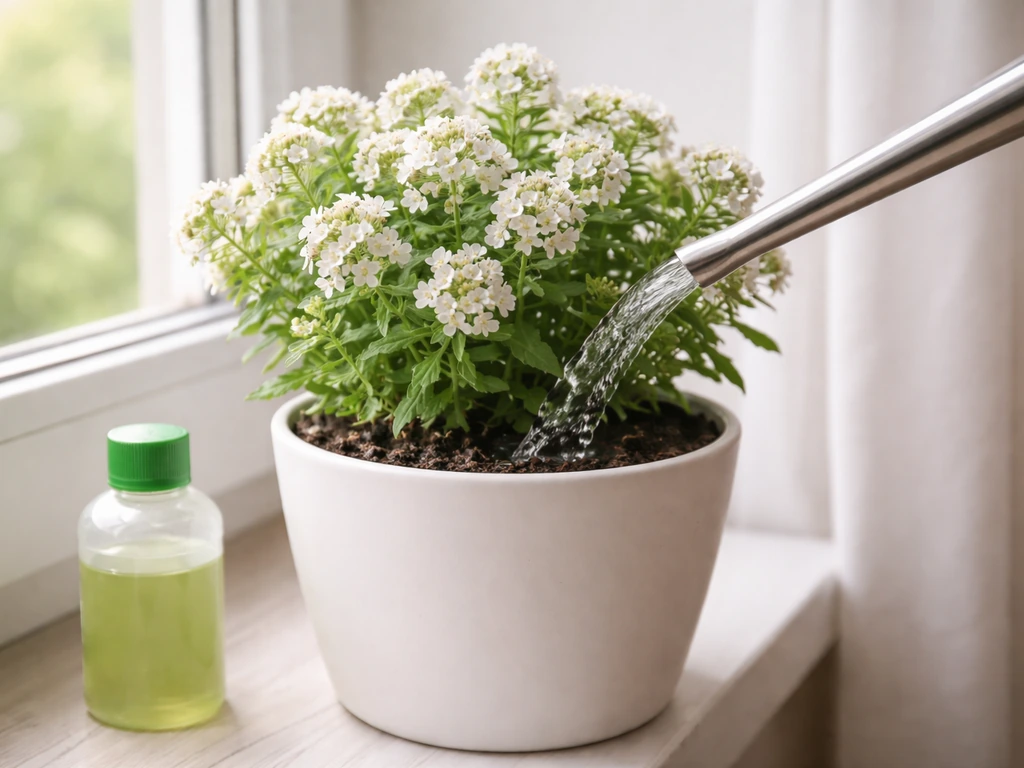
Watering
Alyssum tolerates dry soil well and is more likely to be killed by overwatering than underwatering. Water when the top inch of potting mix feels dry. When you do water, water thoroughly until it drains from the bottom, then let it dry out again. Never let the pot sit in a saucer full of water. In a typical heated indoor environment, that often means watering every 5 to 7 days, but always check the soil rather than sticking to a fixed schedule.
Feeding
A water-soluble balanced fertilizer works well. Proven Winners recommends feeding every third watering for container alyssum. That's a simple, easy rhythm to follow: water plain twice, then add fertilizer the third time. Don't over-fertilize, which pushes leafy growth at the expense of flowers. A balanced formula (like a 10-10-10 or a bloom-booster with slightly more phosphorus) applied at half the recommended dose is a good approach for indoor plants.
Deadheading and trimming
Alyssum doesn't require the same diligent deadheading that some flowers do, but if the plant starts to look straggly or flowering slows, cut it back by about one-third. NC State Extension and OSU PlantFacts both confirm that shearing back the plant rejuvenates it and restores flowering. This is especially useful indoors if warmth from grow lights or ambient room temperature causes a mid-cycle slowdown. After trimming, give a light feed and keep the light running, and new flowering stems typically appear within 2 to 3 weeks.
Common indoor problems and quick fixes
| Problem | Likely cause | Fix |
|---|---|---|
| Leggy, stretched stems | Not enough light | Move closer to grow light or increase daily light hours to 14-16 |
| No flowers or blooms stopping | Too warm or too little light | Lower room temperature to 60-70°F and boost light intensity |
| Wilting despite moist soil | Overwatering or root rot | Check drainage, let soil dry out, remove any rotted roots |
| White powdery coating on leaves | Powdery mildew | Increase airflow with a fan, remove affected leaves, avoid wetting foliage |
| Seedlings collapsing at soil level | Damping-off fungus | Use fresh soilless mix, improve airflow, reduce watering frequency |
| Tiny flies hovering around soil | Fungus gnats | Let soil dry more between waterings, use yellow sticky traps, add a fine mesh over tray |
Leggy growth is by far the most common complaint I hear about indoor alyssum, and it's almost always a light problem. If your stems are stretching toward any light source in the room and the plant looks thin, double your light hours or drop the grow light closer. Powdery mildew and fungus gnats are the other two issues that come up most, and both are solved by better airflow plus dialing back water slightly. The fixes are not complicated, but catching them early matters.
Your indoor alyssum timeline and next steps
Since it's early May right now, you're in an excellent window to start. Alyssum takes about 60 days from sowing to flowering, so seeds started this week could be producing fragrant blooms by early July. Here's how to think about the next few weeks:
- This week: Get a bag of fresh soilless seed-starting mix and a shallow tray with drainage. Sow seeds on the surface (no covering), mist, and place under a grow light or in your sunniest window. Set up a heat mat if you have one.
- Week 2 to 3: Check daily for germination (expect sprouts between day 8 and 15). Keep the soil lightly moist, run a small fan nearby, and make sure light is hitting the seedlings directly.
- Week 4 to 5: Thin or pot up seedlings into their permanent container. Pinch the tips 1 to 2 weeks after transplanting to encourage bushy growth.
- Week 6 to 8: Start your fertilizing routine (every third watering). Watch for any early signs of powdery mildew or gnats and address immediately.
- Week 8 to 10: First flowers should appear. Enjoy the honey-like fragrance, deadhead spent clusters, and trim back if needed to keep the show going.
If you'd rather skip the seed stage, buying a small alyssum start from a nursery now and potting it into a well-draining indoor container is a perfectly valid shortcut. You'll still need the same light and temperature setup, but you'll get flowers faster. Either way, the key is treating light as your priority from day one. Get that right, keep the roots from sitting in wet soil, and add a little airflow, and indoor alyssum is genuinely rewarding.
If you're also exploring other flowering plants for indoors, plants like lobelia and busy lizzies share some of the same compact, cheerful qualities and are worth comparing when you're deciding what to grow alongside your alyssum. If you are also exploring other flowering options besides alyssum, you may be wondering can lamium grow indoors as a related alternative for a similarly compact indoor look.
If you're also exploring other flowering plants for indoors, plants like lobelia and busy lizzies share some of the same compact, cheerful qualities and are worth comparing when you're deciding what to grow alongside your alyssum can lobelia grow indoors. If you're also exploring other flowering plants for indoors, can lantana grow indoors is another useful comparison point alongside options like lobelia and busy lizzies.
Busy lizzies are often grown outdoors, but you can grow them indoors too if you match their light and care needs. Daylilies are a different kind of indoor plant, but the same idea applies: light and temperature determine whether you can get flowers. If you’re wondering can you grow tiger lilies indoors, the same idea applies: you’ll need the right light, temperature, and watering routine If you're also exploring other flowering plants for indoors.
FAQ
Can indoor alyssum flower more than once?
It will, but only if you can meet the light and cool-temperature targets. If your nights stay around 60 to 70°F and you can run a grow light 14 to 16 hours a day, you can often get multiple flushes by cutting the plant back about one-third when flowering slows (typically mid-cycle).
Do I need a timer for my grow light, or will on-and-off manually be fine?
Use a timer for consistent light. Even small changes, like leaving the grow light off for a day or shortening the photoperiod, commonly leads to leggy growth and fewer blooms, especially in fall and winter.
How do I know if my indoor pot setup is draining well enough?
Pick a pot that lets you water, then fully drain. If you place the pot on a saucer, empty the saucer each time you water. Standing water also increases the chance of damping-off in young plants and mildew on leaves in mature plants.
What’s the best way to prevent powdery mildew on indoor alyssum?
For home conditions, prioritize early prevention over treatment. Start with a fan running low a few hours daily, keep watering lighter than you think (water only when the top inch dries), and avoid crowding plants so air can circulate across leaves.
Can I start alyssum seeds indoors during winter, and will the same steps work?
Yes, but seedlings are more sensitive than mature plants. Germinate with light from day one (not a dark shelf), keep the tray only lightly moist, and use fresh or well-cleaned trays to reduce damping-off risk.
What potting mix should I avoid for indoor alyssum?
Moisture-retaining soil can keep roots and stems too wet, which is a common reason indoor alyssum fails. Use a standard potting mix and improve drainage with perlite, then confirm you have drainage holes and that water exits the bottom.
My home runs warm. Will alyssum still grow indoors?
If your space stays above 75°F for long stretches, blooming often stalls even with perfect watering. Move the pot to the coolest room you have, keep it away from heat vents or direct radiator heat, and consider adding ventilation near the plant.
Can I rely on a sunny window instead of a grow light?
A south or west window can work seasonally, but many homes do not deliver equivalent light during short winter days. If you notice stretching toward the window, switch to a full-spectrum LED and keep it 6 to 12 inches above the canopy.
How often should I fertilize indoor alyssum, and how do I avoid “too much leaf” growth?
Fertilize lightly and on a simple rhythm. Overfeeding tends to produce more leaves than flowers. A balanced water-soluble fertilizer at about half strength every third watering is a good indoor starting point.
Will growing multiple alyssum plants in one window box make mildew more likely?
Yes. You can thin or re-space by leaving fewer plants in the final pot. Alyssum looks best massed, but crowding reduces airflow and increases mildew risk, so aim for roughly 6 to 8 inches between plants in larger window boxes.